Door opener DA1

After using the card or chip the DA1 door opener can enter attendance and also engage the electromagnetic door lock (there is a built-in relay inside of DA1). We recommend low-current DC locks. A secondary chip reader can also be connected to the DA1 so that the door can be unlocked by a chip or card from both sides. You can then configure DA1 to always insert for example Clock IN when beeping on DA1, or Clock OUT when beeping at the secondary reader.
The DA1 door unlocker connects to the LAN network using a standard LAN cable (it does not have WiFi, but that can be solved by using a small WiFi client, such as TP-LINK TL-WR902AC) and must have a fixed IP address in your internal network. You also need to run Proxy Agent on some PC in your internal network, which forwards data between DA1 and your GIRITON cloud account. The Proxy Agent must therefore have access to both the DA1 in the internal network and the Internet.
The ProxyAgent communicates with the address *.giriton.com (the IP is not used directly, it can change over time, rather the DNS name is used) exclusively using an HTTPS connection and port TCP 443. The connection is always opened by the client (ProxyAgent) towards the cloud and therefore port mapping is not required.
Configuration of IP Address in DA1
Before installing the DA1 unlocker, you must first set the correct IP address in the DA1. If you gave us the required IP address when ordering the device, we have already configured the DA1 with the correct IP address.
If the DA1 is not pre-set to the correct IP address, it is needed to set up IP address for DA1 manually according to these steps:
- Download the configuration program for Windows.
- Temporarily modify the configuration of your PC's IP address to 192.168.0.10, and set the mask to 255.255.255.0. It is because the default IP address of DA1 is 192.168.0.2. and it communicates only within the mask 255.255.255.0
- In the configuration program click on "Verify connection". If the DA1 managed to connect, fill in the new IP address, the mask, or even the gateway, and by clicking "Change settings" you will save the new configuration into the DA1. DA1 will then automatically reset and since this moment it is set up with a new IP address.
- Revert back the changes on your PC's IP address, which you made in step 2.
Installation of Proxy Agent application
On some PC in your LAN network, in which the DA1 is running, install, turn on, and pair Proxy Agent and let it run in the background.
Note: ProxyAgent application can run in the background as a service. You can install the Service by running a file "service-install.bat", which is located in the folder where ProxyAgent is installed.
The pairing of DA1 in the web application
You have at this moment the ProxyAgent application installed and running. You also have DA1 connected to the electricity, DA1's keyboard should be lit with blue light and it should beep after being turned on. You also have DA1 connected to the LAN network, on which there is a PC with ProxyAgent running.
The following steps are needed to be done in the Giriton web application
- Connect DA1 to electricity and connect to LAN network.
-
In the Paired devices agenda, click on +Device with driver and add a new DA1 device.
In the following window, select the type of RFID 125 kHz ASI1201E-D or NFC 13.56 MHz ASI1201E according to the frequency you purchased (you can also find it on the invoice or the original box).
- While adding the device, it is necessary to select Proxy Agent, which is in the same internal network as DA1 and then the IP address of DA1 in the internal network and port. The default values (login, password) are pre-filled or we send them with a specific DA1.
- The new DA1 will be added to the paired devices, if everything above is met.
-
Subsequently, you can specify the function in the Paired devices of the newly paired DA1 on tab 2 Settings:
- inserting a specific activity when applying the chip to DA1 (can remain empty)
- selection of recording type - start/end of activity/alternation (e.g. first click arrival, second departure)
- project in the inserted activity
- what zone is DA1 intended for - more about setting access zones here
- for which departments or tags is DA1 intended - more about setting up departments and tags here

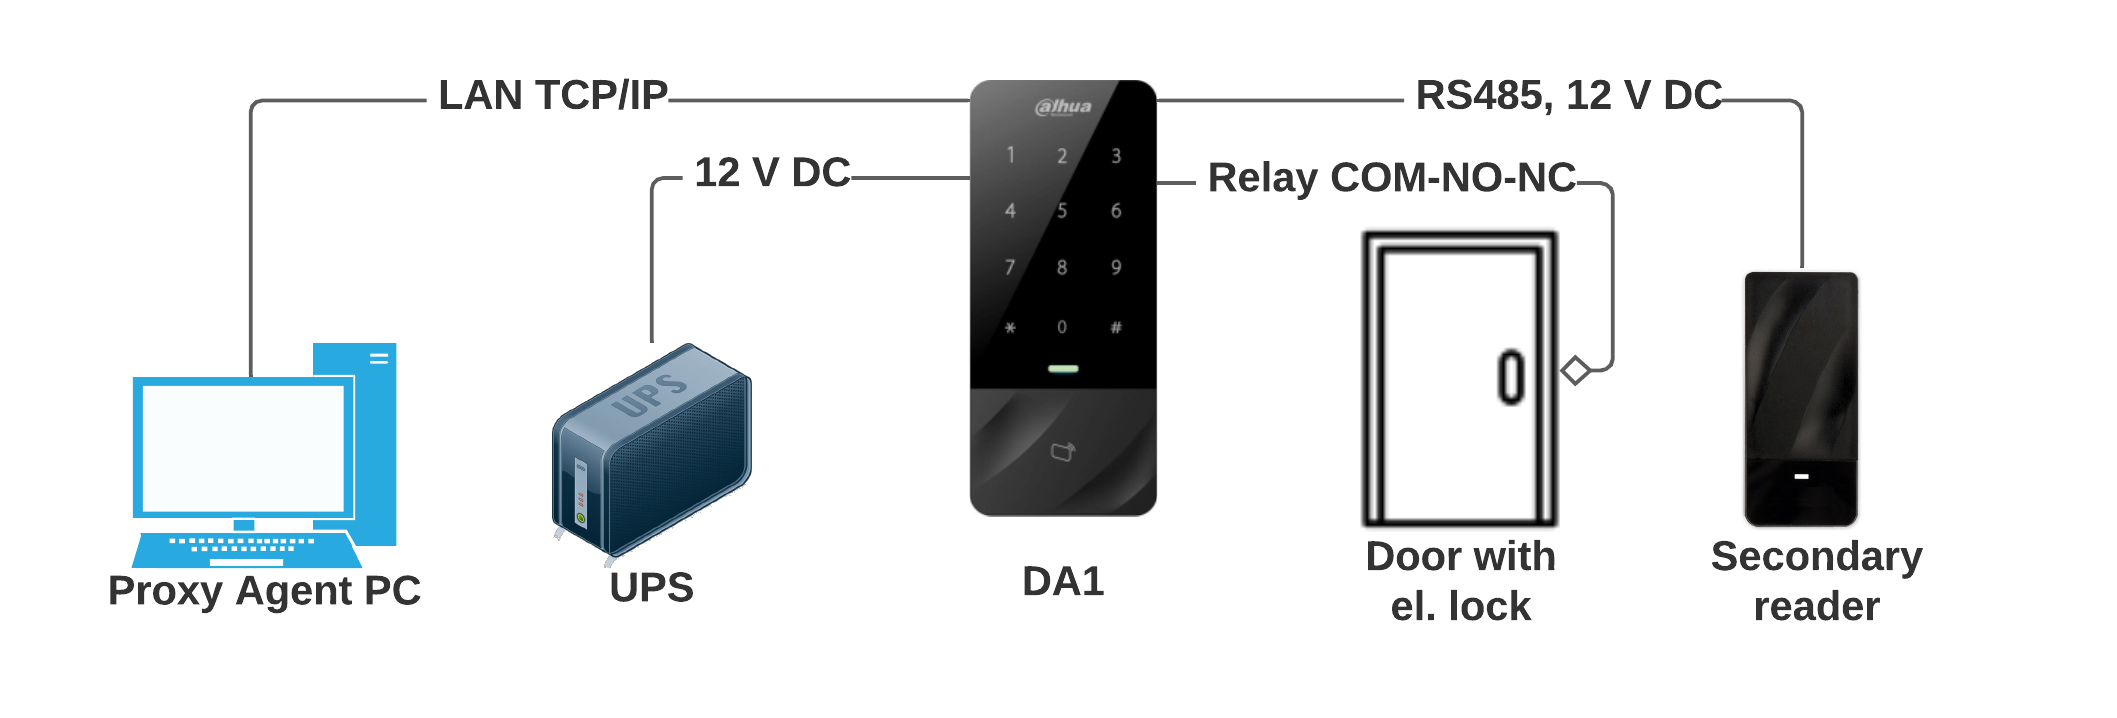
Connection diagram of the DA1 door unlocker together with the secondary reader and connection to the electronic door lock by relay.
We recommend low consumption DC door locks.
We recommend connecting a flyback diode (for example, type 1N5399) or a MOV varistor to DC locks, which will extend the life of the relay and protect the clock from electrical interference, which could otherwise cause the device restarts when the lock operates. We recommend protecting AC locks with a MOV Varistor, diodes cannot be used. Connect the diode or varistor in parallel directly to the door lock contacts.
Hardware installation
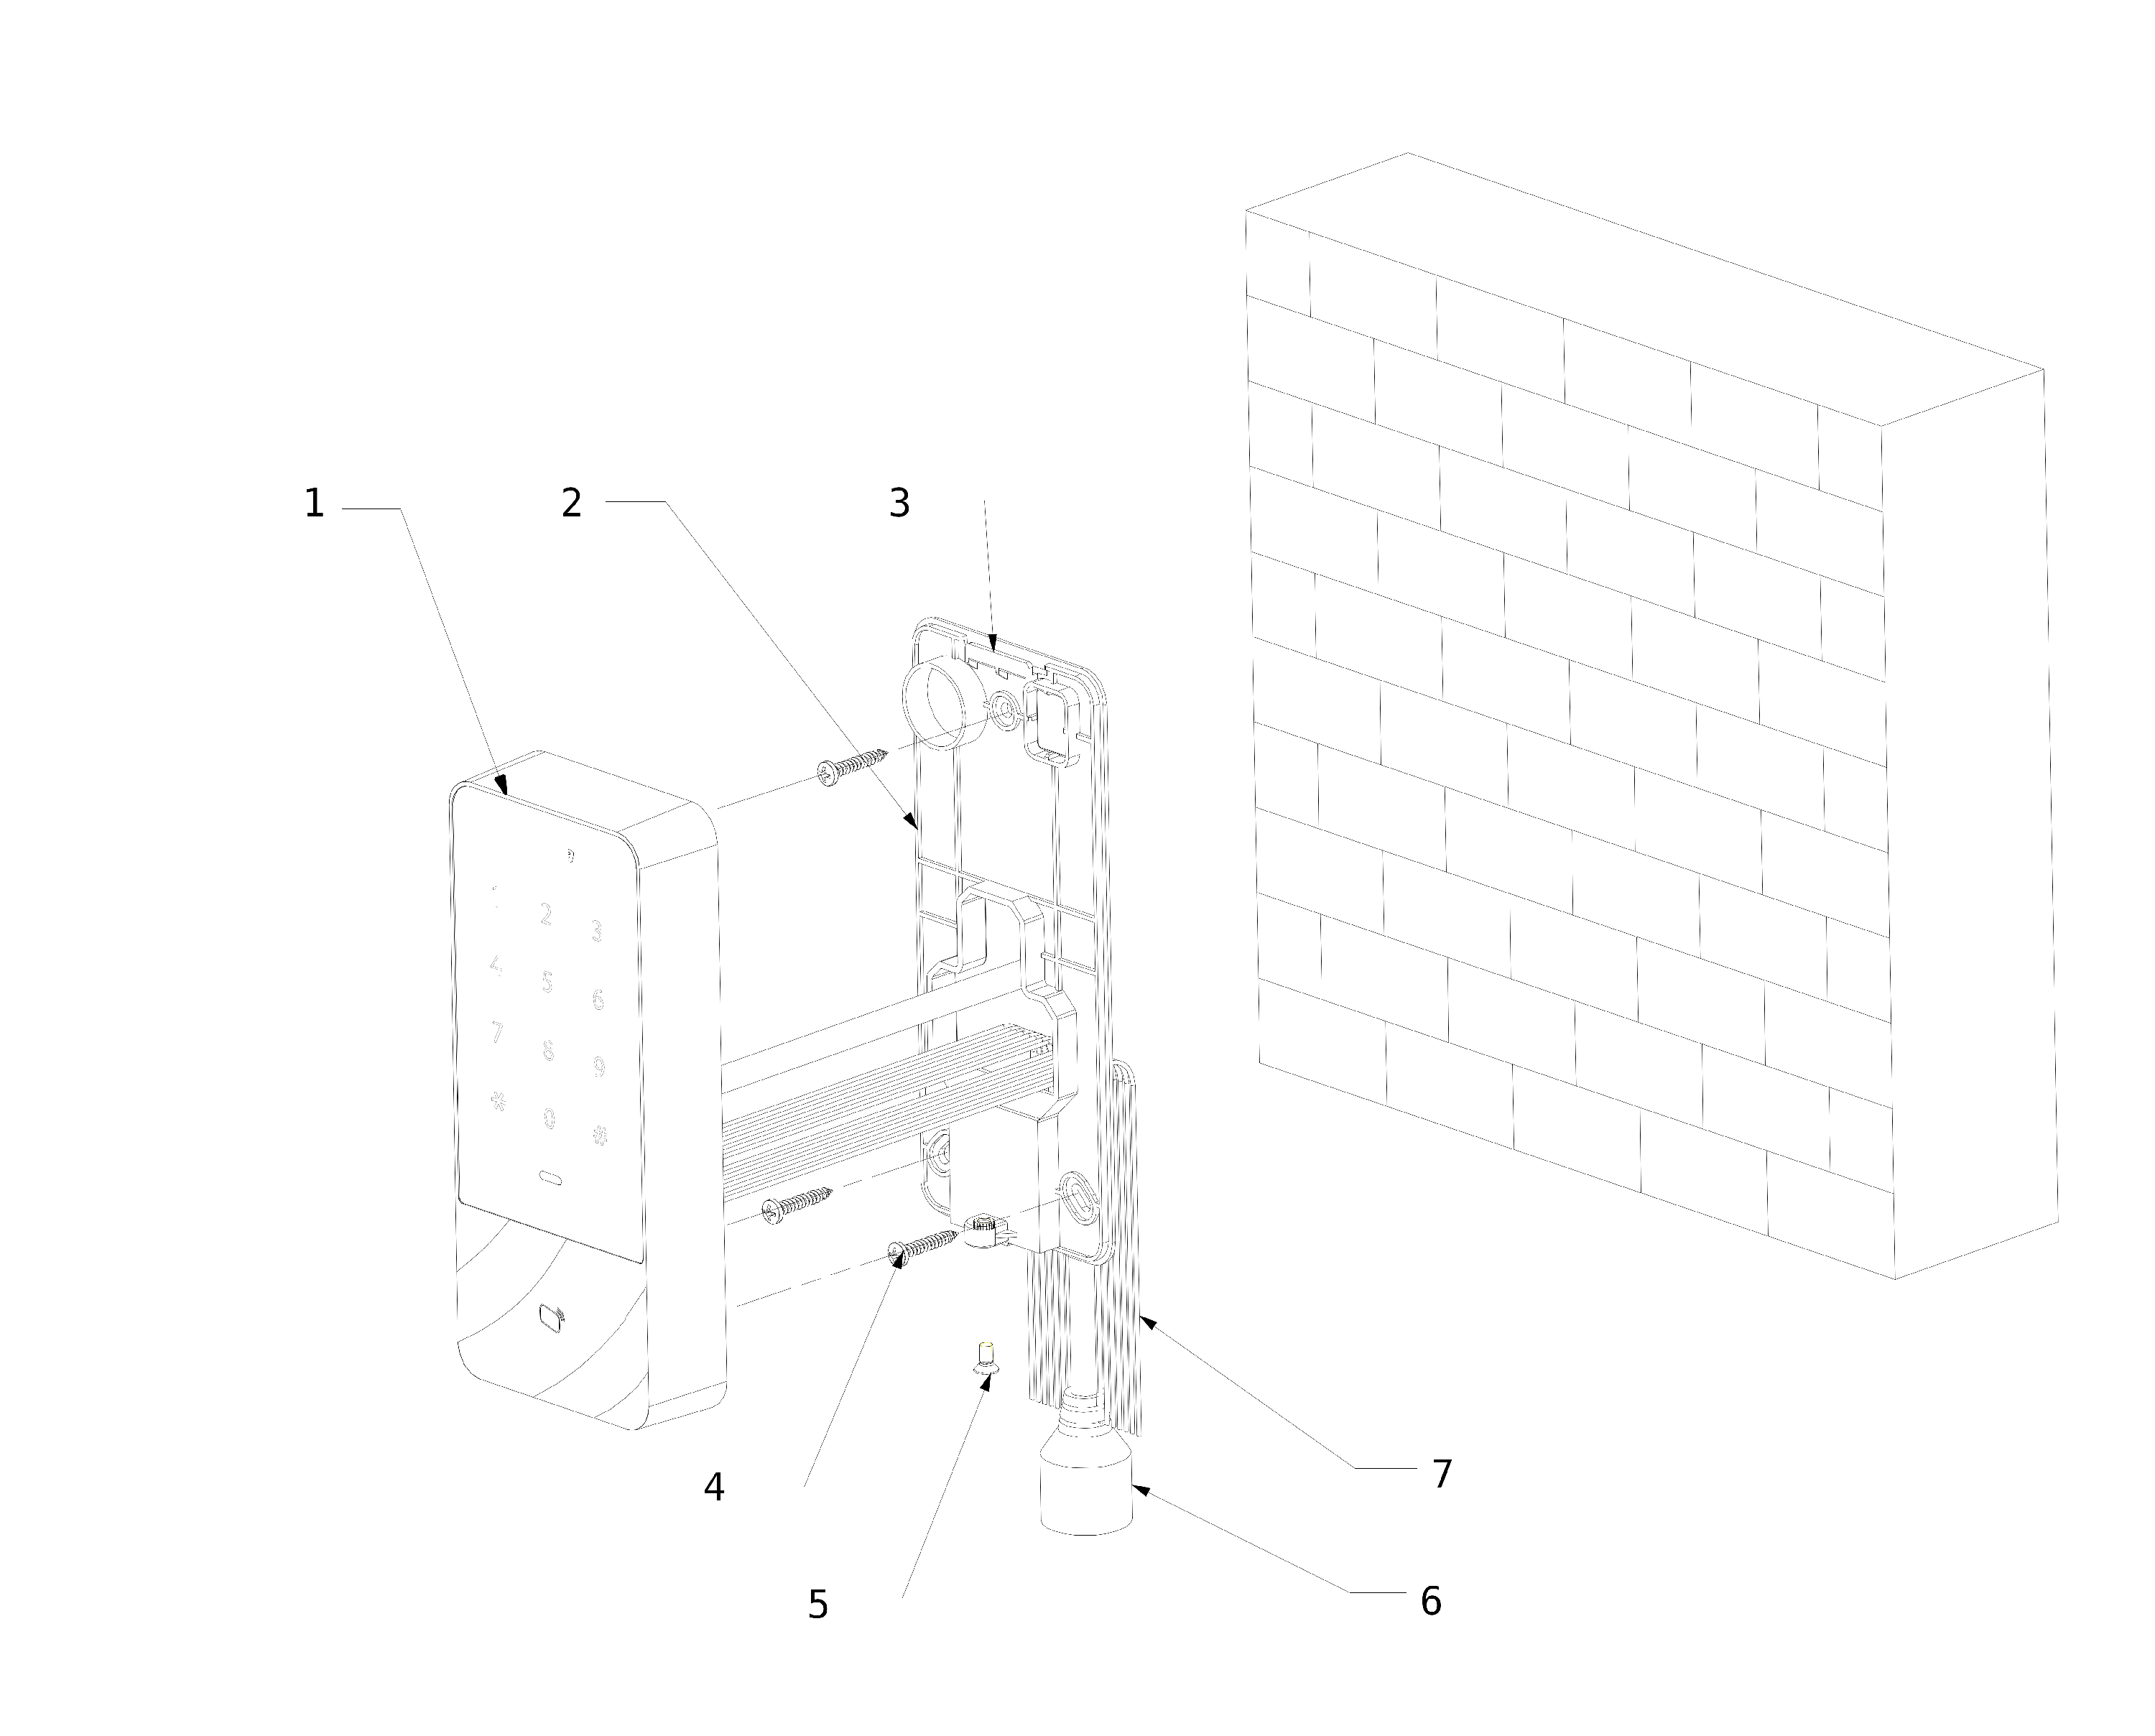
- DA1 device
- Back cover
- Mounting break
- Mounting screws
- Mounting screws
- LAN cable connector
- Cables for 12 V DC power supply, COM-NO-NC relay, RS485 for a secondary reader
Network connection
ProxyAgent is installed on some PCs in the local network. The application forwards data between the Giriton cloud and between DA1 connected in the same network.

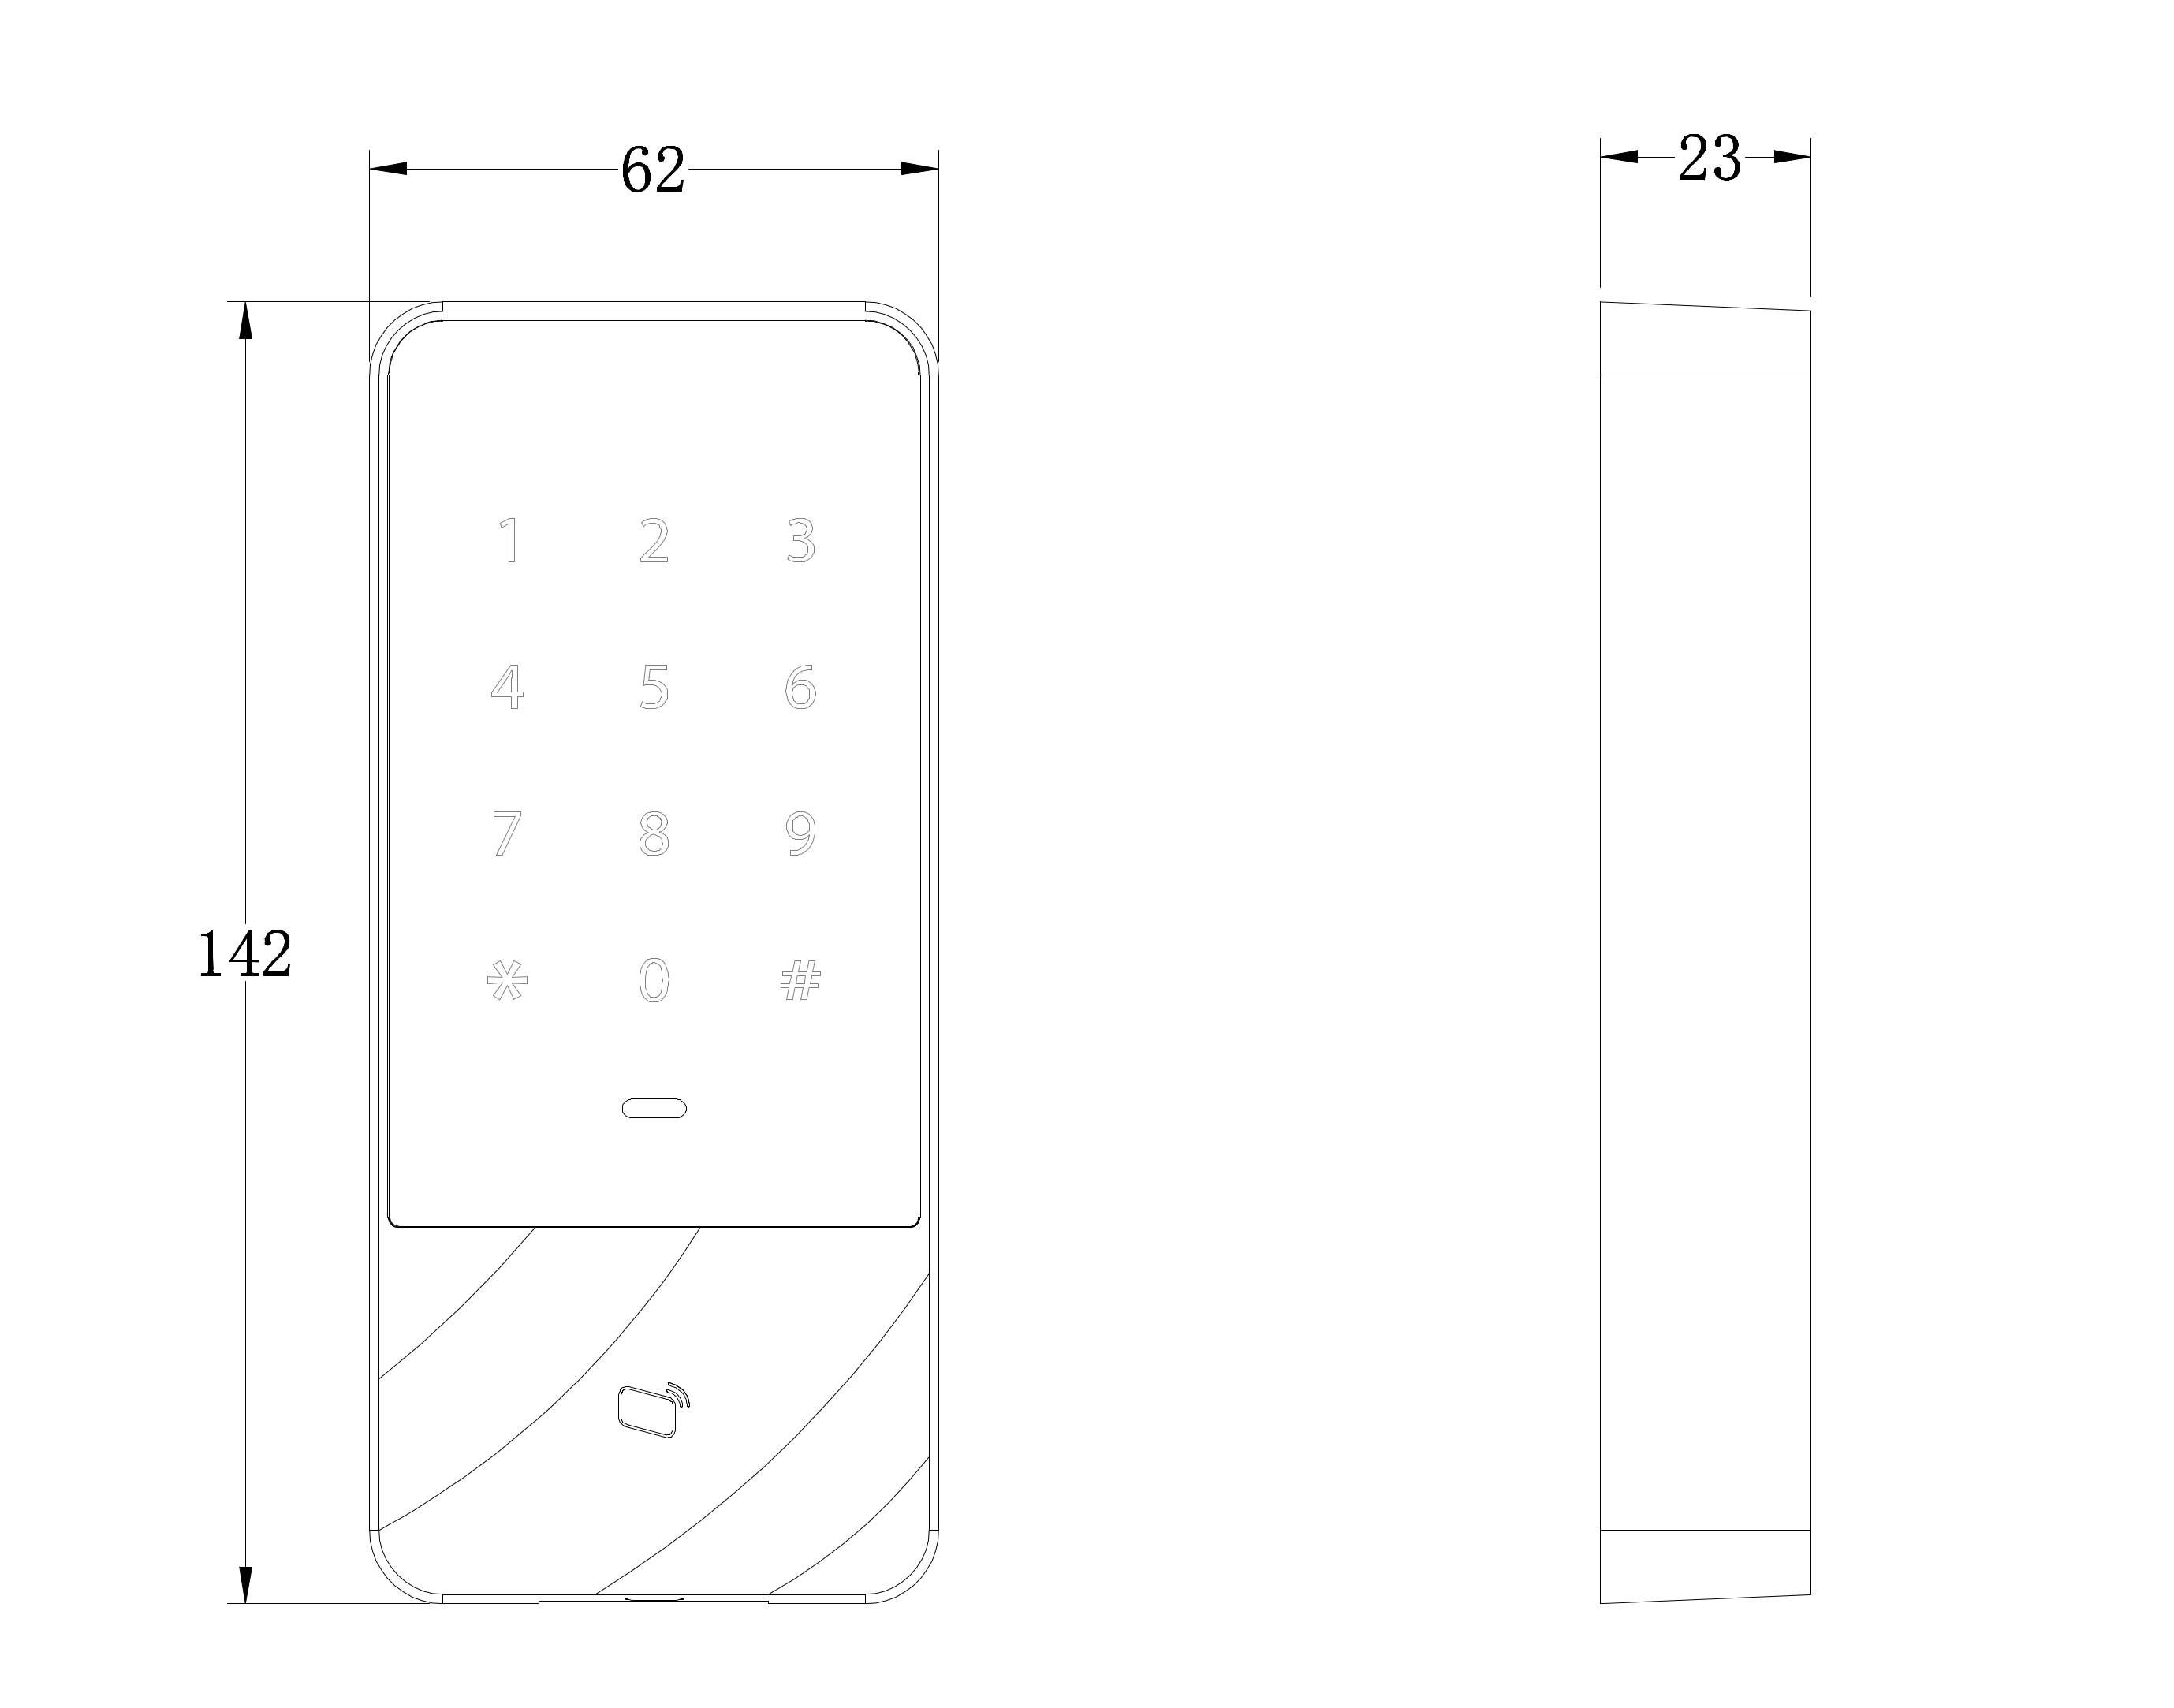
DA1 technical parameters
Chip/card type: EM4100 and EM410X (variant DA1-125kHz) or MIFARE (variant DA1-13.56MHz)
Power supply, consumption: 12V DC, < 2W
Working temperature and humidity: -30°C to +55°C, 10% to 90%
Door relay: type COM-NC-NO, max load 30V / 1A
DA1 used to unlock outside doors
Please consider security when using the DA1 to unlock the outside door of the building. If the thief gets to the DA1, dismounts the device from the wall and connects the correct wires, it will unlock the electrical door lock attached to this DA1 and allow the thief to enter the building. To unlock the door where this is a risk, we recommend placing only a secondary reader on the outer side of the wall, which will be connected to the DA1 located on the inner side of the wall using an RS485 double line. This eliminates a similar risk, as unlocking and manipulating the secondary reader cannot unlock the electrical door lock.
