Attendance Clock

You can use the wall-mounted Attendance Clock supplied by us, or install the GIRITON Attendance Clock application on your own tablet, PC or POS. Such a tablet then serves as a classic time clock, on which users chip their arrivals, departures and other attendance activities.
Besides entering attendance, the Attendance clock also offers other functions such as displaying the Current Attendance, displaying My Attendance, Shift Plans, entering work on Projects or submitting a vacation (a doctor, etc.) requests.
To recognize users the application uses the following:
- NFC chips / contactless NFC cards (devices must have NFC support)
- RFID chips / magnetic cards (the reader connects to the tablet via the USB port, the device must have a USB host)
- Numeric PIN code (set in the Human Resources agenda)
- QR codes (printed from the Human Resources agenda, the device must have a camera)
- Fingerprint (the reader connects to the tablet via the USB port, the device must have a USB host)
How to assign PINs, chips, or fingerprints
a) on the Attendance clock
1. Click menu (three-comma icon) and select User Registration in the Attendance clock application.
2. Select a specific user
3. Click the green button Tap to use chip reader/fingerprint reader and when prompted, place the chip/finger twice on the reader. It is needed to scan a finger multiple times.
4. Continue with other users.
It is possible to protect the access to the Menu with a password after assigning chips to all users. To do so, select Protect the Menu with password in the Menu. It will be required to enter the numeric password after confirming this action. The numeric password can be found in the Web application in the Paired devices agenda after selecting the particular device.

b) In the Human Resources agenda in the web application:
(only if the chip reader is connected by appropriate cable)
1. the Human Resources agenda - click to select a specific user.
2. Click on the tab 5 Attendance at the top of the user’s detail.
3. Click in the field Attendance PIN, chip, QR code 1 and attach the chip to the reader or enter the required PIN code. Its number appears after attaching the chip.
4. Save changes
Network settings
The device takes the IP address, mask, gateway and DNS from the DHCP server, but these can also be set manually in the device.
The device communicates with the address *.giriton.com (the IP is not used directly, it can theoretically change over time, the DNS name is used instead) exclusively using a HTTPS protocol, (TCP port 443). The connection is always opened by the device, therefore the port mapping is not required.
By default, the time clock occasionally connects to a configured NTP server for time synchronization using the NTP protocol (UDP port 123). The NTP server address can be changed on the time clock.
Furthermore, some types of time clocks run Windows 11 IoT LTSC Enterprise 24H2, and these time clocks download Windows updates from the same Microsoft servers as regular Windows systems.
How to troubleshoot Time clock problems
1. The screen is black, does not show anything, does not respond to touch.
- If the screen is black and unresponsive, restart the device by disconnecting the power supply for at least 15 seconds. - If the device does not turn on, check that the adapter is acutally in the socket. If it is possible for you, check with a voltmeter that there is actually voltage at the power connector. By this, we will avoid sending a spare part and installling it which would subsequently also not work due to a possible problem on the adapter side (the adapter is not properly inserted into the socket). - If the adapter is ok, power goes to the tablet but it does not start after connecting, contact us. We will try to send you another another piece within the warranty period, collect yours and consider the possibility of repair.
2. The screen shows the application but it does not respond to touch. The Time clock has frozen and does not show the current time.
- Restart the device by disconnecting it from the power supply for at least 15 seconds. - If the situation repeats more often, the cause may be strong electromagnetic interference. Such interference usually occurs in electric motors (e.g. workrooms with machine tools). In this case we can supply a power filter to the Time clock which would prevent possible interference from the electric. The cause of similar freezing can be some types of electronic door locks which then need to be supplemented with a quenching diode (DC locks) or MOV Varistor (AC locks).
3. The screen shows the application, the buttons respond to touch, a red exclamation mark is shown on the screen.
- A red exclamation mark indicates an offline state, i.e. a situation where the Time clock is not connected to the Internet. This is not a problem temporarily (the entered attendance is saved in the device and sent later) but it is better to have the Time clock online. - Exit the Attendance clock application via Menu -> Exit application -> Exit application. If the Time clock requires password (access to the Menu may be protected with a password), you can find this password in the Web application -> Paired devices agenda. - In the Android system go to Settings -> System -> Network & Internet to check if the device is connected to the correct WiFi or wired network. - In the Android system go to Settings -> System -> Date and Time to check if the date and time are set correctly. If the date is se too wrong, the device will not be able to communicate properly over some HTTPS and will appear offline even though the WiFi is working properly. - Open a web browser (most commonly Chrome) on the device and check that the various web pages load. If all of the steps are followed but the website does not load, contact your network administrator to evaluate the situation.
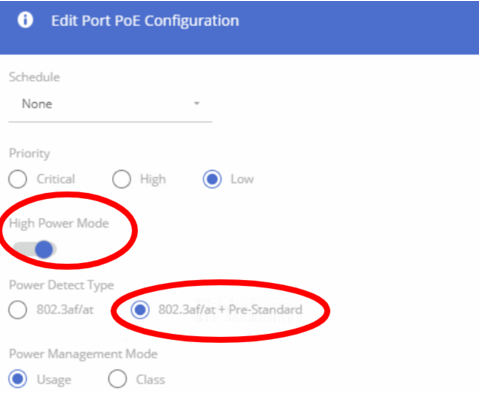
4. Attendance clock powered by PoE cable is freezing or often rebooting
Check that PoE injector/switch is type PoE+ IEEE 802.3at. If the PoE switch is configurable, ensure the specific PoE port has "High Power Mode" turned on, alternatively "802.3af/at + Pre-Standard".
5. Chip reader is not working - 7" attendance clock
Check the cable connectivity into the attendance clock, you can unplug and plug back in the reader again. After reconnecting the reader, it should make a sound notification. Try reading multiple chips to rule out, that the error is because of a faulty chip. Afterward, check updates in Menu (icon with three lines) - Check for updates. If the punch clock will require a PIN code (accessing the menu can be protected by a PIN code), you can find out the PIN code from the web app in the Paired devices agenda. If an update is available for installation, confirm it. The attendance clock will download the update itself, install it and then it will restart. If the previous steps did not help, do not hesitate to contact our tech support.
How the Attendance clock works with fingerprint data
GIRITON attendance clocks see link work with fingerprints as follows:
- Only the mathematical equation describing the fingerprint (from which the original form of the fingerprint cannot be recovered) is stored, and not a "scan/image" of the fingerprint (from which the original fingerprint could be recovered). Specifically, fingerprint markers are stored in the format and according to ISO/IEC 19794-2:2005.
- This data is stored both in the protected memory of the individual punch clocks and on the cloud server running the GIRITON system. The cloud server and the database backups are in the Microsoft Azure cloud, specifically in the "EU West" zone. The data therefore does not leave the EU.
- On the server, the data is secured by encrypting the disk on which it resides. In transit, the data is secured by encryption using HTTPS certificates.
- The system does not offer the ability to "export" fingerprint marker data. That is, even a company account administrator with the highest permissions cannot export fingerprint marker data from the system.